Installing SAMBA on CentOS 6 – Map Network Drive, Shared Storage, Network Storage
Samba is a Linux tool which enables a Windows (or other Linux) user, to mount a remote drive from a Linux Server onto their Windows machine, creating you a local samba share mount point.
There are various uses for this, maybe you are running out of space on your local pc but have plenty space on a linux server on your local network or elsewhere that you want to utilise as if it was local. Or maybe you are looking to backup your local files somewhere remotely, then Samba is your new friend !!
Installation of Samba – Network Samba Share
First you need to install the software, and make it auto start on server reboot.
yum install samba samba-client samba-common
chkconfig smb on
chkconfig nmb on
Configuration of Samba
Take a backup copy of the original samba config file and then create your configuration
cp /etc/samba/smb.conf /etc/samba/smb.conf.bak

rm /etc/samba/smb.conf

touch /etc/samba/smb.conf

vi /etc/samba/smb.conf
Cut and paste the following basic config into your smb.conf which will create you a shared area called storage01 in /home/samba/storage01
#======================= Global Settings =====================================

[global]

workgroup = WORKGROUP

security = user

map to guest = bad user

socket options = TCP_NODELAY IPTOS_LOWDELAY SO_RCVBUF=65536 SO_SNDBUF=65536

#============================ Share Definitions ==============================

[storage01]

path = /home/samba/storage01

browsable =yes

writable = yes

guest ok = no

valid users = @smbgrp
Create your shared storage area (rename this to whatever you put in the path in smb.conf)
mkdir -p /home/samba/storage01
Add a user and group (from smb.conf) that will be used to access the shared area, and add the user into the smbgrp
useradd sambashare

groupadd smbgrp

usermod -a -G smbgrp sambashare
Set a password for your new samba user
smbpasswd -a sambashare
Set permissions on your shared storage area to your samba user/group
chown -R sambashare:smbgrp /home/samba/storage01

chmod -R 0770 /home/samba/storage01
Restart SAMBA to take effect your config changes
service smb restart

service nmb restart
And run a test to ensure you entered the configuration correctly
testparm
Mount your new shared area on your local pc
Now to make your new area accessible from your local pc….
Open My Computer so you see your standard list of drives. Click on the Map Network Drive button –

Samba – map network drive – Samba Share
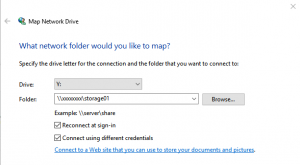
Now enter the path in the following format –
\\servername\mountname
The servername can be hostname or ip address, and the mountname is what you put in smb.conf ([storage01] – so here in the config file above it would be storage01)
You need to click the ‘connect using different credentials’ tick box, and then put in the samba user and password you created above –

Samba – map drive path and user details – Samba Share
When you click Finish your new drive should connect and appear in your list of drives.
For more information about Samba including more advanced configuration check out the official Samba website HERE