Author Archives: admin

Browser showing Latin IDN url (chrome/opera)

Browser showing Latin IDN url  (chrome/opera)

If your browser showing latin IDN url (latin alphabet translation) of urls in the address bar this can be fixed using the notes below.

One of my more recent projects has been to get delegated the Georgian alphabet IDN. This has now been achieved and we are preparing for launch of registrations.

As an end user the first thing I wanted to work was for the registration website url to display in Georgian in Chrome. Most modern browsers support this, but need a little ‘tweaking’ to make it work.

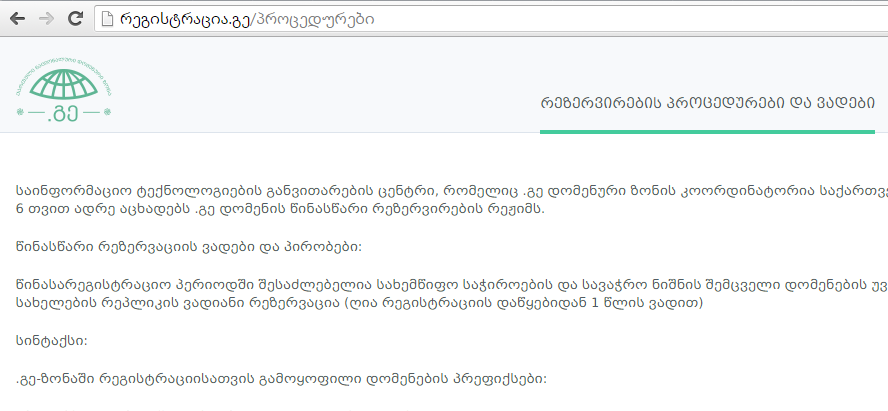
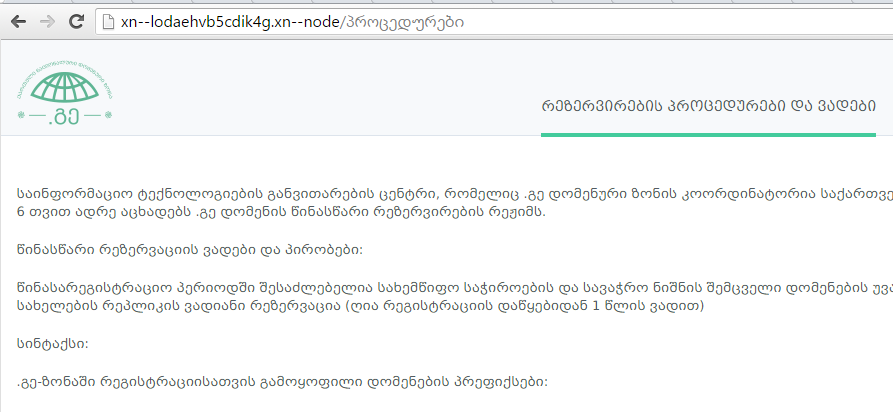
In my situation I was trying to get to რეგისტრაცია.გე but it was displaying in the address bar as http://xn--lodaehvb5cdik4g.xn--node/ (not very friendly!!). Here is the display –

Browser showing Latin IDN url (chrome/opera) - url showing in latin translation of url showing in chrome

Browser showing Latin IDN url (chrome/opera) – url showing in latin translation of url showing in chrome

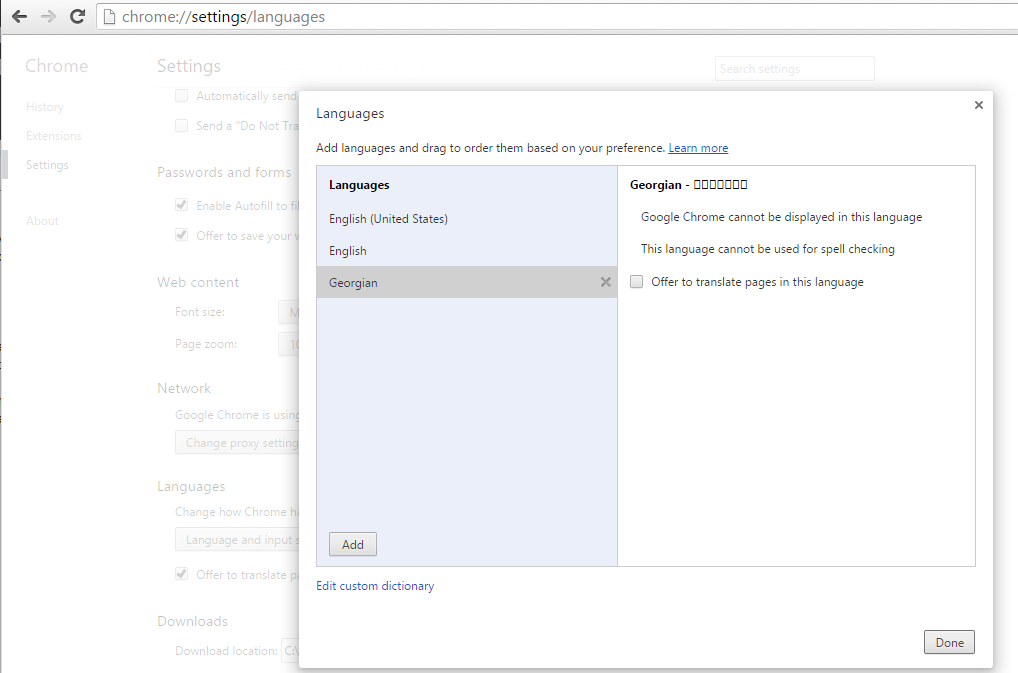
In order to fix this in Google Chrome (and Opera) is a fairly simple process if you go to Chrome Settings, advanced, Language and Input settings, you can then add the language you need like this –

Browser showing Latin IDN url (chrome/opera) - chrome add language - url showing in latin translation of url showing in chrome

Browser showing Latin IDN url (chrome/opera) – chrome add language – url showing in latin translation of url showing in chrome

Now without even having to refresh your web page it now displays the url in the appropriate language as shown here –

Browser showing Latin IDN url (chrome/opera) - chrome add language - url showing in latin translation of url showing in chrome - georgian mkhedruli translation of url showing in chrome

Browser showing Latin IDN url (chrome/opera) – chrome add language – url showing in latin translation of url showing in chrome – georgian mkhedruli translation of url showing in chrome

The above solution also works in Opera browser using a similar method to add the language in the browser settings.

So it is not ideal, and im sure a lot of end users do not even know there is a language setting in their browser they can change, but for international domain name owners it is maybe useful to have a ‘Hints and Tips’ section on their registrations site which shows users how to make their domain more accessible and friendly !!

Download Google Chrome HERE

Download Youtube video – CentOS (Linux), Windows, Mac

download youtube video

download youtube video

Download Youtube video – CentOS

At some time or another everyone has wanted to download Youtube video to have locally. From Linux (or Windows or Mac) this is a fairly simple task thanks to youtube-dl !! Easy installation, fast, flexible

Installation of youtube-dl

To install the latest youtube-dl, check the latest url from their site HERE

wget https://yt-dl.org/latest/youtube-dl -O /usr/local/bin/youtube-dl

Make the program executable like this –

chmod 755 /usr/local/bin/youtube-dl

And that really is it !! youtube-dl is also available for Mac and Windows so check the website link above to download it.

Using youtube-dl to download videos and playlists from Youtube

To download video from Youtube (Single) :

youtube-dl "https://www.youtube.com/watch?v=MFxlwVhwayg"

To download a playlist with multiple videos just put in the playlist url :

youtube-dl "https://www.youtube.com/watch?v=lG79da7Uxyk&list=RDlG79da7Uxyk"

There are many options to name your files as you want, choose which quality video you wish to download etc etc so check out the help page here –

youtube-dl -h

Every now and then if you experience any issues with downloading videos you can update youtube-dl to the latest version –

youtube-dl -U

Just for Youtube downloads?? Well NO. youtube-dl can download videos from a LARGE number of other sites as well! You can see the ever expanding list of sites it supports HERE

Samba Share – Installing SAMBA on CentOS 6 – Shared and Network Storage

Installing SAMBA on CentOS 6 – Map Network Drive, Shared Storage, Network Storage

Samba is a Linux tool which enables a Windows (or other Linux) user, to mount a remote drive from a Linux Server onto their Windows machine, creating you a local samba share mount point.

There are various uses for this, maybe you are running out of space on your local pc but have plenty space on a linux server on your local network or elsewhere that you want to utilise as if it was local. Or maybe you are looking to backup your local files somewhere remotely, then Samba is your new friend !!

Installation of Samba – Network Samba Share

First you need to install the software, and make it auto start on server reboot.

yum install samba samba-client samba-common

chkconfig smb on
chkconfig nmb on

Configuration of Samba

Take a backup copy of the original samba config file and then create your configuration

cp /etc/samba/smb.conf /etc/samba/smb.conf.bak
rm /etc/samba/smb.conf
touch /etc/samba/smb.conf
vi /etc/samba/smb.conf

Cut and paste the following basic config into your smb.conf which will create you a shared area called storage01 in /home/samba/storage01

#======================= Global Settings =====================================
[global]
workgroup = WORKGROUP
security = user
map to guest = bad user
socket options = TCP_NODELAY IPTOS_LOWDELAY SO_RCVBUF=65536 SO_SNDBUF=65536
#============================ Share Definitions ==============================
[storage01]
path = /home/samba/storage01
browsable =yes
writable = yes
guest ok = no
valid users = @smbgrp

Create your shared storage area (rename this to whatever you put in the path in smb.conf)

mkdir -p /home/samba/storage01

Add a user and group (from smb.conf) that will be used to access the shared area, and add the user into the smbgrp

useradd sambashare
groupadd smbgrp
usermod -a -G smbgrp sambashare

Set a password for your new samba user

smbpasswd -a sambashare

Set permissions on your shared storage area to your samba user/group

chown -R sambashare:smbgrp /home/samba/storage01
chmod -R 0770 /home/samba/storage01

Restart SAMBA to take effect your config changes

service smb restart
service nmb restart

And run a test to ensure you entered the configuration correctly

testparm

Mount your new shared area on your local pc

Now to make your new area accessible from your local pc….

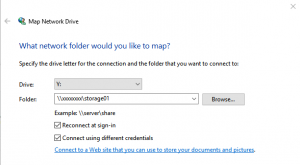
Open My Computer so you see your standard list of drives. Click on the Map Network Drive button –

Samba - map network drive

Samba – map network drive – Samba Share

Now enter the path in the following format –

\\servername\mountname

The servername can be hostname or ip address, and the mountname is what you put in smb.conf ([storage01] – so here in the config file above it would be storage01)

You need to click the ‘connect using different credentials’ tick box, and then put in the samba user and password you created above –

Samba - map drive path and user details - Samba Share

Samba – map drive path and user details – Samba Share

When you click Finish your new drive should connect and appear in your list of drives.

For more information about Samba including more advanced configuration check out the official Samba website HERE

Managed Hosting Services – CentOS Linux

managed hosting services datacentre

managed hosting services datacentre

Managed Hosting Services – CentOS Linux

It is common knowledge that Linux Hosting provides far greater performance for less CPU compared to any Windows Hosting. This makes it a much more cost effective solution for companies wanting to put their websites live.

The major stumbling block is many users lack of experience or nervousness of using Linux as an operating system. Having managed hosting services provides not only security, peace of mind that your data is secure, and the knowledge that you have support as and when you need it.

To be honest for any website the operating system it is running on is irrelevant in its day to day running. For an end user, a web page hosted on a Linux server looks ABSOLUTELY IDENTICAL to one running on a windows server. The bonus of Linux is it might actually load up faster!

I have been running managed hosting services for friends and collegues for a few years now, including a relatively low powered vps server running CentOS, which runs a total of 15 active wordpress websites using very little utilisation on the server.

Part of the key to this is managing the server and security / performance updates, pro-active monitoring of core services, and optimising parts of the web infrastructure to get the most out of the hardware available.

CentOS is one of the most popular Linux distributions powering millions of servers around the world. It is best known for its stability, reliability, and flexibility for a wide range of applications. Check the official CentOS website HERE

I have access to an array of different low cost hosting servers to match anyones specification, therefore if you are looking for managed hosting services for your web application, or other application then get in touch HERE and im sure I can work out a solution that meets your needs.

Plex Media Server – Review, Uses, Functionality, Installation for your personal media library

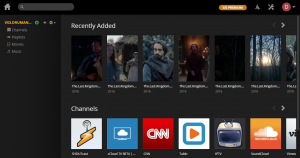
Plex Media Server - Personal media storage available everywhere

Plex Media Server – Personal media storage available everywhere

Plex Media Server – Review, Uses, Functionality, Installation for your personal media library

Something that caught my eye recently was Plex Media Server. I was looking for a solution that gave me a few tools including –

1) Central storage of my media files without the need to ‘sync’ the data to my local device
2) All media accessible anywhere with an internet connection
3) Ability to share my content easily to my friends without physically sending them huge files

STORAGE

I recently purchased a Lenovo Ideacentre 300 pc in a stick (will review this later in another post) as a replacement for my ageing laptop. I am very happy with it, but its biggest limitation is its lack of space in order to store all my media. I therefore wanted a solution that gave me remote storage of my media collection (mp3s and movies) that did NOT require syncing to my Lenovo stick. That instantly ruled out something like dropbox, onedrive or other similar tool.

ACCESS

One of my vps servers has provided me the space to store my media, therefore my next step was to find a solution that could give me access it from anywhere.

Firstly I added Samba which means I can map a drive from my lenovo stick to the server to enable me to upload new media manually.

Plex Media Server has a free option which allows you to connect via a browser from any device. It also has paid apps for android, ios and more if you want something nicer for each platform. You can register your Plex username HERE

SHARING

Within the Plex Media Server browser app you are then able to share ‘collections’ to other plex users. This means within a group of friends you can each share your content to one another.

ADDITIONAL OPTIONS

An additional option to add further flexibility and ease of use for your Media Centre, is to set any torrent downloads you run locally to save to your samba shared drive, therefore auto populating in Plex Media Server when they have completed. Or run something like Deluge (or other server based torrent client) to download your torrent movies directly on the server into your Plex media library. I have installed, configured, and have this working for one of my clients on his own server and it works fine.

If you are looking for something like this to use for yourself, then CONTACT ME and I can rent you a server, and configure it all for you

Microsoft Visio Free Alternative – Dia – Free Download

Microsoft Visio is the best known of all, however it comes with a cost attached. I spent a lot of time looking around for alternatives, including photo/image software, but none was very satisfactory until I came across DIA. Best of all it is a Microsoft Visio FREE alternative.

Free Alternative Microsoft Visio – Dia – Open Source

High on a System Administrator’s list of required tools is some software to draw network diagrams, floor plans, schematics and other technical drawings.

DIA is pretty much a perfect piece of software, which is relatively simple to use, has a wide variety of ‘objects’ you can use to accurately represent your diagrams.

The official DIA introduction says –

Dia is an application for creating technical diagrams. Its interface and features are loosely patterned after the Windows program Visio. Features of Dia include multiple-page printing, export to many formats (EPS, SVG, CGM and PNG), and the ability to use custom shapes created by the user as simple XML descriptions. Dia is useful for drawing UML diagrams, network maps, and flowcharts.

Screenshots of DIA

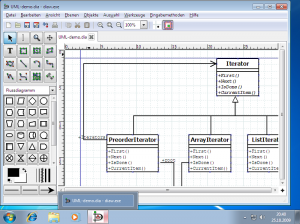
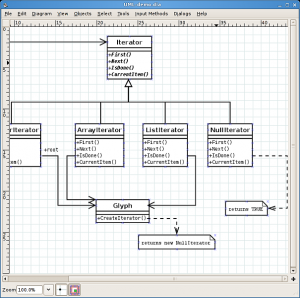
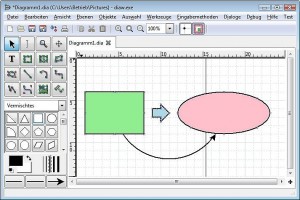
Heres just a few screenshots I got from the DIA website that show how simple it is to use.

Microsoft Visio Free Alternative- DIA

Microsoft Visio Free Alternative – DIA

Microsoft Visio Free Alternative - DIA

Microsoft Visio Free Alternative – DIA

Microsoft Visio Free Alternative - DIA

Microsoft Visio Free Alternative – DIA

Downloading DIA – Microsoft Visio Free Alternative

DIA runs on any version of Windows I have come across, so it should work for you. It is also available on Mac and Linux as well.

Download and install it from HERE

If you need additional objects not included in the base set then check out more available HERE

DIA also has a ton of documentation in English, French, German, Polish and Basque you can get HERE

If you like DIA as a Microsoft Visio Free Alternative as much as we do then let us know !!

Be sure to check out my other Linux articles and useful posts HERE

Linux Voice Recognition – How to implement

ilovebash

ilovebash

Implementing Linux Voice Recognition

Implementing Voice Recognition on Linux may sound like quite a daunting task, and yes, there are many difficulties, and likelyhood of achieving 100% success of translation is almost impossible to achieve. However, achieving even partial success of translating an audio file to text, can be a very useful tool for any business.

Business Uses for linux voice recognition

I came across this whole idea a week or so ago. My goal was to translate the audio from recordings which would then enable me to search a database of translated audio for specific keywords.

Business uses could include :

– Searching for mentions of required text
– Analysis of call centre staff ensuring compliance with their call scripts
– Raising alarm bells from customers who may be abusive to staff

The list is actually quite long, those are just a few that come to me now.

As I said already the issues of 100% success include clarity of the audio, different peoples accents, words that the translation tool cannot find in its dictionary.

Anyway accepting all of the above potential problems, its still fun to try! So here is my method to install pocketsphinx onto CentOS 6 for you to experiment.

Install voice recognition on Linux using pocketsphinx on CentOS 6

Just so you know, I installed this onto an almost ‘clean’ fresh minimal install of CentOS 6 with just the base centos repositories configured as you can see below :

[root@localhost tmp]# yum repolist
Loaded plugins: fastestmirror
Loading mirror speeds from cached hostfile
* base: centos.mirror.srv.co.ge
* extras: centos.mirror.srv.co.ge
* updates: centos.mirror.srv.co.ge
base | 3.7 kB 00:00
extras | 3.4 kB 00:00
extras/primary_db | 33 kB 00:00
updates | 3.4 kB 00:00
repo id repo name status
base CentOS-6 - Base 6,575
extras CentOS-6 - Extras 45
updates CentOS-6 - Updates 652
repolist: 7,272
[root@localhost tmp]#

The program I am installing is called POCKETSPHINX. They have a website I will list later in this post, but for now lets just get it installed and working !!

We need the base package as well as the pocketsphinx addon. I generally put these into /usr/local/src as an area where they can be safely compiled. So download and extract the packages as follows :

wget -O pocketsphinx-5prealpha.tar.gz "http://downloads.sourceforge.net/project/cmusphinx/pocketsphinx/5prealpha/pocketsphinx-5prealpha.tar.gz?r=http%3A%2F%2Fsourceforge.net%2Fprojects%2Fcmusphinx%2Ffiles%2Fpocketsphinx%2F5prealpha%2F&ts=1447353369&use_mirror=netix"

tar -zxvf pocketsphinx-5prealpha.tar.gz

wget -O sphinxbase-5prealpha.tar.gz "http://downloads.sourceforge.net/project/cmusphinx/sphinxbase/5prealpha/sphinxbase-5prealpha.tar.gz?r=http%3A%2F%2Fsourceforge.net%2Fprojects%2Fcmusphinx%2Ffiles%2Fsphinxbase%2F5prealpha%2F&ts=1447353479&use_mirror=netassist"

tar -zxvf sphinxbase-5prealpha.tar.gz

mv sphinxbase-5prealpha sphinxbase

If the above download links dont work then simply get the latest from the CMUSphinx download page HERE

I then found out that in order to first install sphinxbase it has a couple of dependencies including Python. To install those do this :

yum install bison python-devel.x86_64 pcre-devel.x86_64

The other issue I had was it also requires a version of SWIG which is newer than the one in the standard Centos repositories. To get that I downloaded and compiled the latest version of swig (3.0.7) from their sourceforge page :

wget "http://prdownloads.sourceforge.net/swig/swig-3.0.7.tar.gz"

tar -zxvf swig-3.0.7.tar.gz

cd swig-3.0.7
./configure
make
make install

Now that all the dependencies for sphinxbase were installed I compiled it like this :

cd /usr/local/src/sphinxbase
./configure --enable-fixed --without-lapack
make
make install

In the README for pocketsphinx it says that in order to compile it it was required to have the sphinxbase code within the pocketsphinx src directory. So I copied it like this :

cd /usr/local/src/pocketsphinx-5prealpha
cp -r ../sphinxbase .

And then compiled it like this :

./configure
make clean all
make check
make install

During the ‘make check’ it performs a number of tests of which I had 1 error you can see below :

PASS: test_ps_init
PASS: test_ps_reinit
PASS: test_ps_fwdtree
PASS: test_ps_fwdtree_fwdflat
PASS: test_ps_fwdflat
PASS: test_ps_fwdflat_bestpath
PASS: test_ps_fwdtree_bestpath
FAIL: test_ps_simple
PASS: test_ps_nbest
PASS: test_ps_lattice
PASS: test_ps_set_search
PASS: test_acmod
PASS: test_acmod_grow
PASS: test_fwdtree
PASS: test_fwdflat
PASS: test_fwdtree_fwdflat
PASS: test_fwdtree_bestpath
PASS: test_fwdtree_nbest
PASS: test_pl_fwdtree
PASS: test_ptm_mgau
PASS: test_posterior
PASS: test_fsg
PASS: test_fsg2
PASS: test_fsg3
PASS: test_jsgf
PASS: test_lm_read
PASS: test_dict
PASS: test_dict2pid
PASS: test_senfh
PASS: test_alignment
PASS: test_state_align
PASS: test_mllr
make[5]: Entering directory `/usr/local/src/pocketsphinx-5prealpha/test/unit'
make[5]: Nothing to be done for `all'.
make[5]: Leaving directory `/usr/local/src/pocketsphinx-5prealpha/test/unit'
============================================================================
Testsuite summary for pocketsphinx 5prealpha
============================================================================
# TOTAL: 32
# PASS: 31
# SKIP: 0
# XFAIL: 0
# FAIL: 1
# XPASS: 0
# ERROR: 0
============================================================================
See test/unit/test-suite.log

I spoke to one of the developers at CMUSphinx on their irc channel and he said it was not a problem and to contimue with the ‘make install’ which all worked fine.

You should now be good to do a first test!

Testing Linux Voice Recognition using pocketsphinx

Firstly what you need is an audio file. The audio file should be clear text as much as possible (it does not like too much background noise or music), therefore a recording from a TV news channel is a good place to start.

You need to convert the audio into a format pocketsphinx can read (WAV 16kHz 16-bit mono) which you can do using the media manipulator program FFMPEG (to install ffmpeg read my other tutorial HERE). Here is the command to convert your file :

ffmpeg -i "BBC One BBC News at Six (16 Avril 2015)-9CvYHM_V8Xg.mp4" -acodec pcm_s16le -ac 1 -ar 16000 out.wav

pocketsphinx_continuous was one of the programs installed into /usr/local/bin. It does have a man page, however it is not complete and doesnt say you can make it read from an input file, however you can like this (but it produces a HUGE amount of output to the screen) :

pocketsphinx_continuous -infile "/tmp/out.wav"

What you can see from that output is that it reads the input file in chunks which it then translates. That maybe of use to you, but I just wanted the text. So, to minimise the screen output, I ran it like this :

pocketsphinx_continuous -infile "/tmp/out.wav" -logfn /dev/null

Thats it, you have a translated blob of text from an audio file! As I said earlier here is the link to the CMUSphinx sourceforge page : HERE

The site has a lot of documentation and examples of other use cases so check it out!

As always if you liked this tutorial then please share on Facebook and Twitter, and check out my other Linux tutorials HERE
Yum remove old kernels on CentOS

ilovebash

ilovebash

Yum remove old kernels on CentOS

Here is a quick guide to managing and automatically tidying your kernels on CentOS.

Background

It is generally accepted that keeping up to date with the latest releases of kernel is one of the best ways to ensure security vulnerabilities are patched as fast as possible. Whether you then decide to automatically schedule kernel (and other packages) updates or not is up to you. Personally I take the view that I want to know exactly what has changed on my servers at any given time therefore any updates I will do manually.

On Centos yum is used to install, update or remove core packages and this is used to also control your old kernels.

Kernel updates are normally stored in your /boot filesystem. This maybe combined with your root filesystem, or fairly often you will see administrators build a small seperate /boot filesystem just for this purpose. One reason for this could just be for some cautious disk management. Whatever the case if you are experiencing space problems in boot partition then you will want to fix it!

Check Installed Kernels

To view your currently installed kernels do this :

# rpm -q kernel
kernel-2.6.32-358.18.1.el6.x86_64
kernel-2.6.32-431.3.1.el6.x86_64
kernel-2.6.32-431.17.1.el6.x86_64
kernel-2.6.32-504.8.1.el6.x86_64
kernel-2.6.32-504.16.2.el6.x86_64
#

Yum remove individual kernel

You can remove a specific kernel manually (if for example you know it affects your server badly in some way) like this :

yum remove kernel-2.6.32-431.17.1.el6.x86_64

Manually removing old kernels to keep a specific number

There is a yum utility that you can use to manually keep 2 newest kernels. First install it (if it is not there already) :

yum install yum-utils

Then you can tidy your old kernels for example to 2 using this :

package-cleanup --oldkernels --count=2

Automating removing old kernels

To further automate the process to only keep 2 old kernels you can make the amount of installed kernels permanent by editing /etc/yum.conf and set installonly_limit like this :

installonly_limit=2

If you found this tutorial useful then please share it on Facebook ok Twitter. Also check my other Linux tutorials which may also be of use to you HERE

Bash Shell Script – How to Post to Twitter

ilovebash

ilovebash

Bash Shell Script – How to Post to Twitter

There is a load of php scripts and methods to enable any half competent developer to post a message to their Twitter profile.

However I wanted to post to twitter from a BASH SCRIPT !!!

Uses for this I have used in the past are some automated cron jobs which could post random content based on the output from one of my other scripts. It could be anything from maybe a currency exchange rate, a welcome to new followers, or even a custom message pulled from random from a config file.

Whatever your use for it then here are the tools you need. It uses the current 2015 OAUTH Twitter authentication so will work.

Bash Post to Twitter – Installation

ok as I suggested, the core of this is a PHP script, but able to be called from a bash script. So first you need to download and unzip this to a location where your bash scripts run from :

wget "http://bashworkz.com/twitter-php.tar"

tar -xvf twitter-php.tar

Next part is to get the keys you need and create the application on Twitter. Log in https://dev.twitter.com/ with your regular user, and create a new app. You need to set it WRITE PERMISSIONS which allows you to connect to it from BASH.

In there note down the consumerKey, consumerSecret, accessToken, and accessSecret (there is an option to generate the accesstokens)

Configuration and Bash script

Next create a php file called something like twitter_send.php and put in this :

<?php

$inMsg = $argv[1];

echo "Sending $inMsg";

require_once 'twitter-php/src/twitter.class.php';

$consumerKey="AAAAAAAAAAAAAAAAAAA";

$consumerSecret="BBBBBBBBBBBBBBBBBBBBBBBBBBBBBBBB";

$accessToken="CCCCCCCCCCCCCCCCCCCCCCCCCCCCCCCCC";

$accessTokenSecret="DDDDDDDDDDDDDDDDDDDDDDDDDDDDDDDDDDDDDD";

$twitter = new Twitter($consumerKey, $consumerSecret, $accessToken, $accessTokenSecret); try { $tweet =

$twitter->send("$inMsg");

} catch (TwitterException $e) {
echo 'Error: ' . $e->getMessage();
}

?>

Obviously now you can see you need to put in the consumer and access details in the appropriate variables above. Also make sure the twitter-php path is correct to match your installation (you can specify full path if you want)

Testing Bash Post to Twitter

So now you can see from $inMsg = $argv[1]; that the first parameter to the php script is the message, therefore to test the script you can do this :

php twitter_send.php "Hello"

Check your Twitter page and your message should be there.

Now with this test code in hand you can easily add this to any other BASH shell scripts you have and vary the message being sent. One other potential use could be notifications of processes running/completed on your system (clearly you should keep confidential info out of it).

Next tutorial I will write will be similar, but will show you how to post an IMAGE to Twitter.

Dont forget to check out my other BASH tutorials and tips HERE including my recent one how to upload and download a file from Google Drive HERE

Install Gdrive Google Drive Linux Client – Upload/Download/Share a file

Google Drive Linux Client - ilovebash

Google Drive Linux Client – ilovebash

Uploading or Downloading a file – Google Drive Linux Client using GDrive

Maybe something people can use as additional storage space?? GDrive is a Google Drive Linux Client that no Unix Administrator or user can do without.

Whilst browsing around the net a few weeks ago I came across a tool that just grabbed my attention. On the face of it I wasnt sure how useful this would be, but I showed it to one of my clients just in case he found some business function where he could use it.

Anyway last week he came back to me as he wanted to share a file with multiple people so this tool seemed ideal to be able to do it.

Introduction to GDrive

Firstly this tool can be used across multiple flavours of Linux (I use Centos 6 normally), as well as raspberry pi, windows (not sure of the practical use for this…), and even Apple Mac.

Installing GDrive – Google Drive Linux Client

Simply download the latest version from their github page HERE

For my Centos 6 server I used this one : drive-linux-x64 v1.9.0

(right click and copy link url then paste into wget below)

wget -O /usr/local/bin/gdrive "paste url here"

I copied the file into /usr/local/bin so it is globally available to all users on my server, and I also renamed it to gdrive juat as I thought that would be easier to remember !! Dont forget to make the file executable (chmod +x /usr/local/bin/gdrive) and thats it !!!

Configuring GDrive using your Google Drive Linux Client

When you first run any gdrive command it will prompt you to link it to your google drive account and give it permissions. Easiest way to do this is just to try and list the files on your Google Drive like this :

gdrive list

The program will then return with a url you need to link it to your account. Here is how I did it :

1) Open Chrome (or any browser) and log in to the Google account you want to link gdrive with
2) Make sure you can see in your apps Google Drive appearing (the menu in the top right is normally where it appears
3) Paste in the url from the output of the ‘gdrive list’ you did earlier, and accept the permissions prompt it needs to enable gdrive to upload and download files.

Once you have done all that then go back to your command line session and run the ‘gdrive list’ again. You should see a list of your files on Google Drive !!

First proper test of GDrive – Uploading a file – Google Drive Linux Client

Once again a very simple process. As example just copy your /etc/hosts file to Google Drive like this :

gdrive upload -f /etc/hosts

How damn simple is that !!!

Run your ‘gdrive list’ again to see your file there. You can also see it in your browser if you are still logged in Google Drive (or log back in just to check then you know it all works!)

Downloading a file from Google Drive Linux Client with GDrive

Ok so you may have noticed when you did ‘gdrive list’ in the previous steps that each file has an ID? Do it again and you will see :

# gdrive list
Id Title Size Created
0B0tRrdcY7CwJZHh5ZmVpZHRMYW8 drive-linux-amd64 10 MB 2014-09-25 17:47:08
0B0tRrdcY7CwJY2lNS2x3NC1lQUU drive-linux-386 8 MB 2014-09-25 17:47:01
0B0tRrdcY7CwJR3lmZnlRaFZwOHc drive-linux-arm 9 MB 2014-09-25 17:46:57
0B0tRrdcY7CwJQlRfQUVxY2hkWUE drive-linux-rpi 9 MB 2014-09-25 17:46:52

So to download a file it is the ID you use and not the filename. Therefore just as simple this is how you download a file :

gdrive download -i 0B0tRrdcY7CwJZHh5ZmVpZHRMYW8

And thats it !! Are you falling in love with this program as much as I did?? (dont worry, I have got over it now…)

Sharing a file you have uploaded to Google Drive Linux using GDrive on the command line

The one part of this program that maybe could be improved in the future…. sure you can share a file, the only limitation at the moment is you can only share to EVERYONE, and not to specific people/emails.

Anyway here is how you do it. Same as the download option you need the file ID which you can get from the ‘gdrive list’ method :

gdrive share -i 0B0tRrdcY7CwJZHh5ZmVpZHRMYW8

Other functionality in GDrive – Google Drive Linux Client

There is a few other options in GDrive that are pretty cool ive listed below :

– Delete a file from Google Drive
– Create a folder on your Google Drive (this folder can also be shared to everyone)
– Upload a file into a folder on Google Drive (using a parent ID of the folder)

Not bad at all for a freebie !!!

Any comments or questions let me know, dont forget to share this post to others who may find it useful, and please check out my other Linux and Bash tips HERE and HERE